As previously documented, using native SQL Server backup for ConfigMgr recovery has been supported since CM 2012 Sp1 and later.
SQL backups are the preferred technique for backing up the ConfigMgr for a number of reasons.
Here is my list of why native SQL Server backups are superior to the built-in ConfigMgr maintenance task:
– Backup databases other than ConfigMgr (ReportServer, ReportServerTempdb and SUSDB)
– Use database compression (the space savings can be huge)
– ConfigMgr services continue to run while backup is in motion
– Can send email notifications on completion (or failure)
– More granular control over scheduling of backup time
Since ConfigMgr (Current Branch) build 1511 was introduced, in addition to SQL databases, the CD.Latest folder (located in the installation path for Configuration Manager), also needs to be backed up.
Why do I care about the CD.Latest folder?
As updates are delivered to ConfigMgr, updates to the ConfigMgr binaries are updated in the CD.Latest folder as well.
The source files for CD.Latest are used as follows:
· Backup and Recovery – if you need to re-install a site and want it to be the same build number, the files contained will be an exact version match. If you need to recover a site and do not have the contents of CD.Latest folder – you cannot recover the site!
· Child primary site – if you need to re-install a child primary site in a hierarchy you must use the CD.Latest folder that matches the CAS version
· Expand an existing site – if you need to turn your primary site into a multi-site hierarch, you will need to use CD.Latest to install the CAS. (Hopefully you do not have to do this!)
TIP: If you need to perform any of the above steps, you will need to copy the contents of CD.Latest to a path outside the Configuration Manager installation to get ALL of the available options.
I’ve assembled the following step by step guide to create a backup task for SQL Server to back up the core items you need for a successful recovery.
Caveat(s): This guide will not cover other files that you will need for a complete recovery; OSD images, source for packages/applications, drivers, etc. (please see the references section for more information). Always test the restore process in a lab prior to actual use! Keep fingers out of the cage and do not feed the animals. J
How to backup ConfigMgr using SQL Server Agent tasks
You will start by creating an SQL Server Agent task to back up the cd.latest folder.
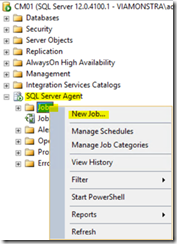
1. Using SQL Server Management Studio, expand the SQL Server Agent node. Right click Jobs, then New Job…
Perform the following steps:
a. After Name: type Backup CDLatest
b. On left, click Steps
c. Click New…
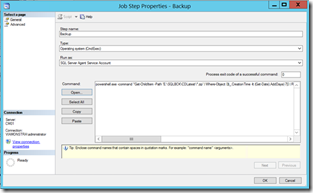
2. For the Job Step Properties, perform the following steps:
a. After Step Name: type Backup
b. For Type: select Operating system (CmdExec)
c. Copy the following PowerShell command into the clipboard (Note: modify paths as needed to match your environment, should be one line)
powershell.exe -command "Get-ChildItem -Path 'E:\SQLBCK\CDLatest\*.zip' | Where-Object {$_.CreationTime -lt (Get-Date).AddDays(-7)} | Remove-Item | Add-Type -Assembly 'System.IO.Compression.FileSystem' -PassThru | Select -First 1 | % { [IO.Compression.ZIPFile]::CreateFromDirectory('e:\program files\microsoft configuration manager\cd.latest', 'e:\SQLBCK\CDLatest\CDLatestArchive' + (Get-Date -format 'yyyyMMddHHmm') + '.zip') }"
d. Paste into the Command Window, click OK.
Now, you will start by creating an SQL Server Agent task to back up the cd.latest folder.
1. Using SQL Server Management Studio, expand the Management node > click Maintenance Plans, right click Maintenance Plan Wizard.
2. Click Next. At the Select Plan Properties, after Name: type: BackupCM, then click Next.
3. At the Select Maintenance Tasks, select the following, then click Next.
a. Clean up History
b. Execute SQL Server Agent Job
c. Back Up Database (Full)
d. Maintenance Cleanup Task
4. At the Select Maintenance Task Order, select the Execute SQL Server Agent Job, click Move Down until this task is last.
5. Click Next. At the Define Back Up Database (Full) Task > General tab, Select Databases, then enable All user databases. Click OK.
6. At the Define Back Up Database (Full) Task > Destination tab, perform the following:
a. Enable Create a backup for every database
b. Enable Create a sub-directory for each database
c. Type the folder name (or UNC) location for your SQL backups (sample: E:\SQLBCK)
d. After Backup file extension: type bak
e. Enable All user databases. Click OK.
7. At the Define Back Up Database (Full) Task > Options tab, perform the following:
a. After Set backup compression: select Compress backup
b. Click Next.
8. For the Define Maintenance Cleanup Task, perform the following:
a. Type the folder name (or UNC) location for your SQL backups (sample: E:\SQLBCK)
b. After File Extension – type bak
c. Enable Include first-level folders
d. In the File age section, change delete files older than to 1 week
e. Click Next.
9. For the Define Execute SQL Server Agent Job Task, perform the following:
a. Locate and select the Backup CDLatest SQL Agent task (created in the first task)
b. Click Next
10. At the Select Report Options, Click Next.
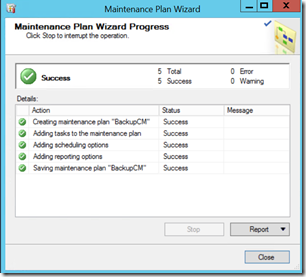
11. At the Complete the Wizard, click Finish.
Schedule this SQL Server maintenance task
1. Using SQL Server Management Studio, expand the SQL Server Agent node. Right click Jobs, select the BackupCM task, right click Properties.
2. From Job Properties, choose Schedules, then New…
3. From New Job Schedule, perform the following:
a. After Name – type Backup
b. After Frequency – select Daily
c. Note change time of backup (if needed)
d. Click OK
e. Click OK
Notes:
· Before running the first time, be sure to manually create a folder in the back up path for CDLatest. In this example, browse to E:\SQLBCK and create a folder: E:\SQLBCK\CDLatest
· To test this agent tast prior to the scheduled backup time, right click newly created SQL Server agent task BackupCM, right click Start Job at Step…
· It is usually a good idea to create a separate maintenance plan to back up your System Databases. Schedule this task to run weekly with a 4 week retention.
References:
Backup and Recovery in Configuration Manager
The CD.Latest folder for System Center Configuration Manager
Configuring backup in ConfigMgr Current Branch
ConfigMgr 2012 Site Backup and Recovery Overview


Pingback: Configuration Manager SQL Server Backup guidelines | Skatterbrainz Blog
Are there any special requirement for getting the CD.Latest backup job working via a job? I can run the commands manually and it works perfectly, but via SQL Agent Job it shows “Success”, but the backup file isn’t created.
Check that the quotes and double-quotes are ANSI and not the word like curved quotes. Check that you have the proper paths.
First of all thanks for a great guide Steve, very helpful 🙂
I’m having the same issue as Justin it seems in that when running the SQL Server Agent Job (both as PowerShell and CmdExec) the job completes and reports success however when actually verifying the CD.Latest zip file it is no larger than 1KB in size and has failed to actually backup the CD.Latest folder? If I run the exact same command line via PowerShell itself the backup completes fully.
Anyone else experienced this or suggest anything please?
Thanks for the added detail. Given that the PoS command works from the PoS editor, it could be one of two things… the account running the SQL Server Agent service does not have permissions. Or the default path that SQL Server is using to run PoS is wrong. Check this link about specifying pathing to Powershell.exe (method 2) https://stevethompsonmvp.wordpress.com/2013/10/07/running-powershell-as-an-sql-server-agent-task/ Let us know the outcome?
Hi Steve,
Apologies as I came across the cause and didn’t post back!
The link you posted would have helped me identify it sooner so thanks for that 🙂
It appears that I needed to configure express NTFS permissions for the domain\sccmsql (SQL Server Agent Account) on the cd.latest directory after I noticed that account context the job was running under.
Once I’d given the account READ\EXECUTE, LIST CONTENTS for “This folder, subfolder and files” the whole process finishes exactly as hoped.
Again many thanks for the great guide as it’s helped me immensely!
How do I backup the cd.latest if SQL isnt running on the site server. So I have a remote SQL server. What powershell command should I use then?
Haven’t tested that scenario. Try using a UNC to the cd.latest folder, and make sure your sql server agent account has permissions.
Pingback: Dave’s SCCM Current Branch Packing List | Skatterbrainz Blog
Great posts. I know this gets continuially asked of you for these types of posts, but I would like to know what the actual answer is. You say that the bak files are all that is needed to restore. I understand that, but what about the Content library (SCCMContentLib folder)? Does this need to be backed up and archived? Obviously the package source files, usmt data, and scup db need to be backed up on its own. I also see you are backing up the master db where as in other posts I see just the site db, ssrs + temp, and susdb are all that is needed. I’m still running 2012 R2 CU3 so I don’t have a cd.latest. Maybe I should just stick with Microsoft built in plan as I don’t quite understand here what is going on.
Thank you for the feedback. In the post, I did explicitly state: Caveat(s): This guide will not cover other files that you will need for a complete recovery; OSD images, source for packages/applications, drivers, etc. (please see the references section for more information). Always test the restore process in a lab prior to actual use! Keep fingers out of the cage and do not feed the animals. J
The Microsoft maintenance plan copies the database files, inbox files and other log files. You gain absolutely nothing using this method over the SQL backup technique. Except, a lot more required disk storage space since db files are not compressed, no backup of the other databases you site, and all of the other “stuff” backed up is discarded during a restore.
Apologies for the blog necro, but please could you clarify what you meant re. the inboxes etc. Are you saying that there’s no value in backing up the inbox folders (which the SCCM maintenance task would do)? Can I perform a full recovery from just the SQL backup and the CDLatest? (and of course the packages etc … that’s a given!). Thanks for the awesome blog Steve. Very much appreciated by myself and many of my SCCM & SQL colleagues.
Glad you like my blog. Absolutely no value in backing up the Inbox folders. Any Inbox contents are not used for site recovery… which makes the site maintenance task less than helpful. >”Can I perform a full recovery from just the SQL backup and the CDLatest?”
That is all you need.
Check out my other blog post on restore: https://stevethompsonmvp.wordpress.com/2014/08/01/how-to-recover-a-configmgr-2012-site-using-a-restored-db/
I found an interesting bug while trying to do a restore. I’m using 1702. My SQL database is split into 8 files, the extension for the first file is .mdf and the extension on the 7 subsequent files is .ndf. When performing a restore, the wizard puts the .mdf file in the user data folder where it’s supposed to go, but it puts the .ndf files into the log folder, which is different from the user data folder. Because the files are in the wrong place the database fails to attach and the restore fails. I have to manually copy the files into the correct folder before running the restore, or manually copy them to the correct folders, attach the database manually, run a partial restore.
Thanks for your comment. This is a known issue, unfortunately, not well documented.
Pingback: SSRS ReportServer log file uncontrolled growth | Steve Thompson [MVP]
Pingback: Using SQL Maintenance Plans to Backup SCCM CB – The Notorious DRR
Pingback: The ConfigMgr Accidental DBA | Steve Thompson [MVP]
Pingback: SQL Performance Tips for MEMCM – Part 2 | Steve Thompson [MVP]